Week 12 – 2019 – Sara

Hi once again…

In this blog I’m just gonna be explaining how our competition code will work,and what we have to fix ( by we I mean me and Oliver).

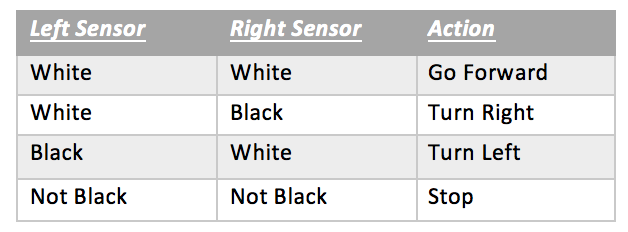
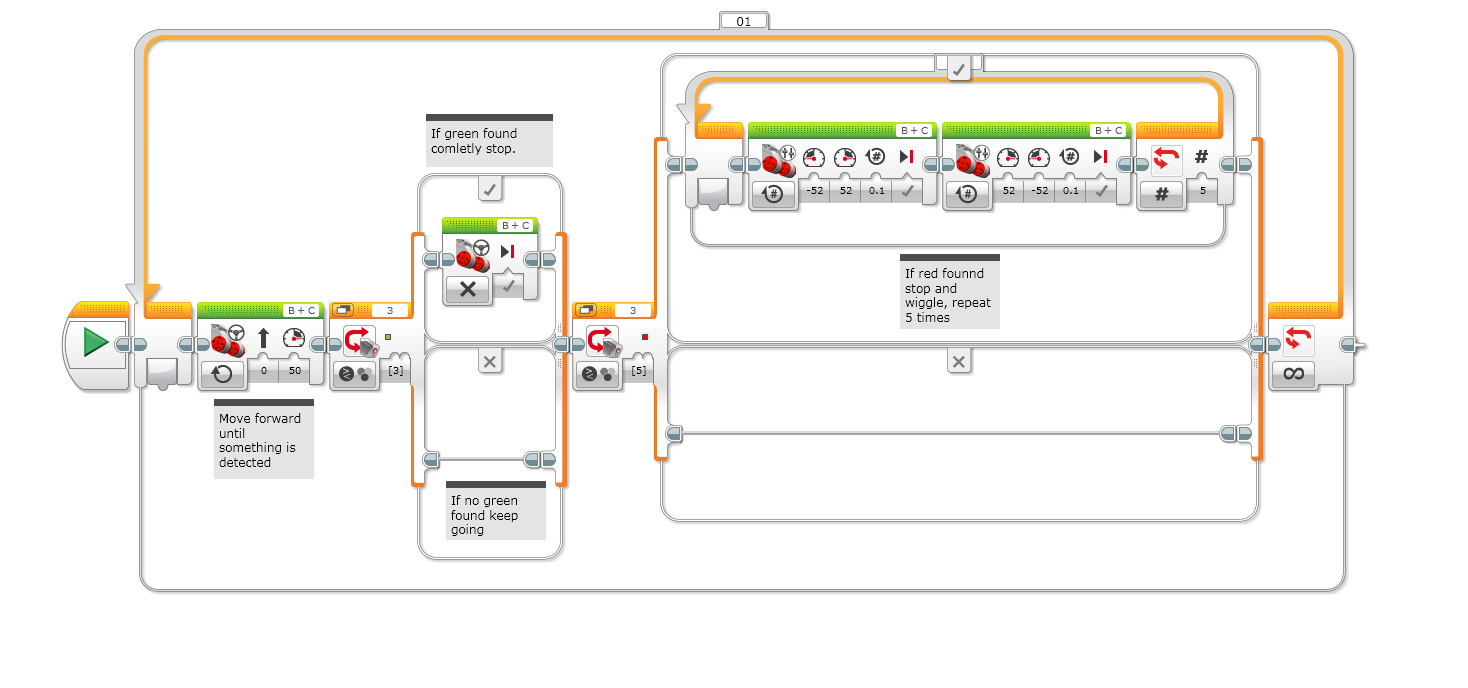
This is the complete code…

MangoBots Competion Code

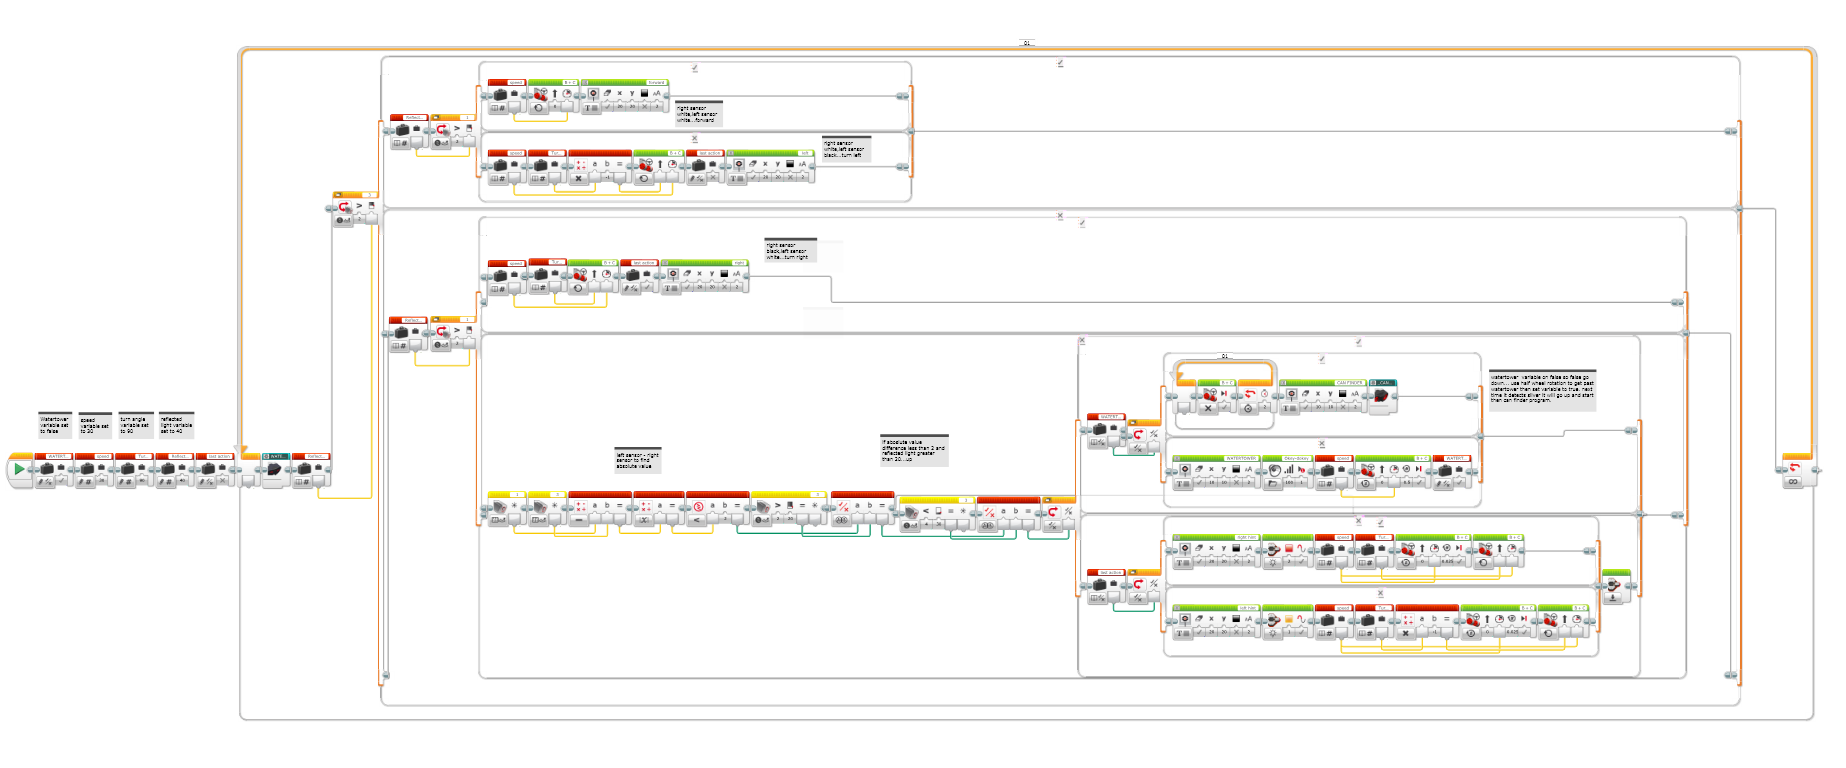
You can click on it to make it bigger…

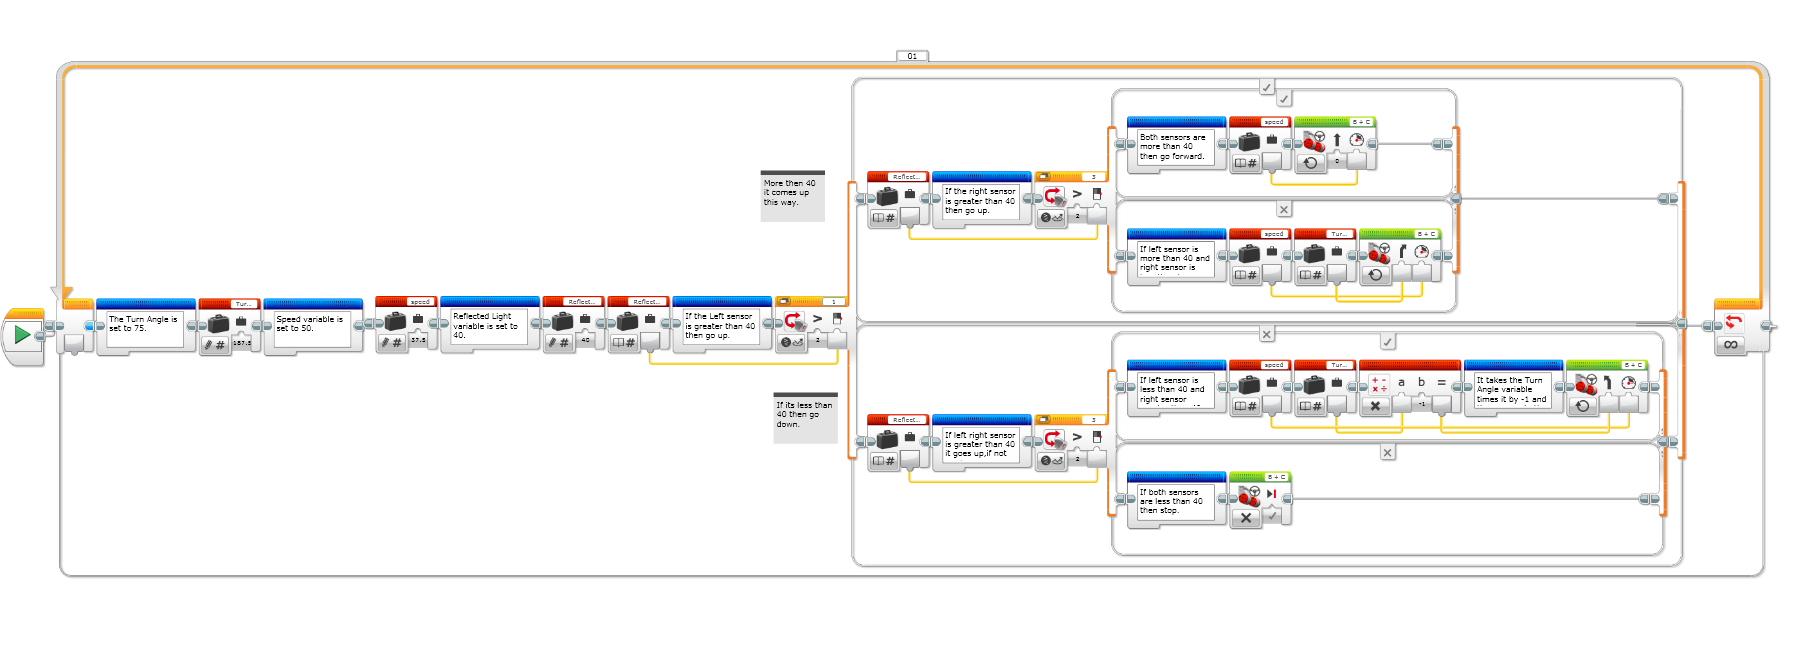
That’s the code we’ll be using, but to make it easier to explain I’ve broken it into parts…here’s the first part…

Variables

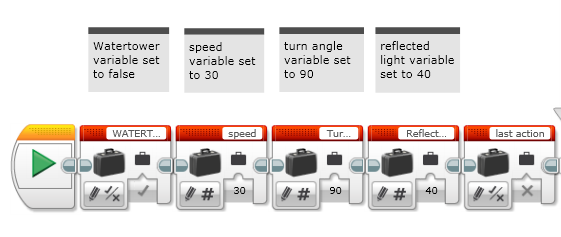
These are our current variables.

The first is the Watertower, it’s a flag variable and it’s set to true that means it thinks it has already found a silver bit meaning it doesn’t need to find another one, instead the next time it sees silver it should just stop. If it were set to false it would be looking for the silver watertower dot.

The second variable, Speed. its currently set to 30

The next variable, Turn Angle. That variable tells the robot how aggressive its turn should be when following the line. Its set to 90.

The Reflected Light variable is set to 40, why… because if its over 40 we know its white, if its under 40 then we know its a dark colour. And that makes it easier for the robot to know when to follow a line.

The final variable, Last Action. It detects what side the robot last turned, left or right. Then when it knows the last action it uses that as a guide when following hints.

Left, Right and forward

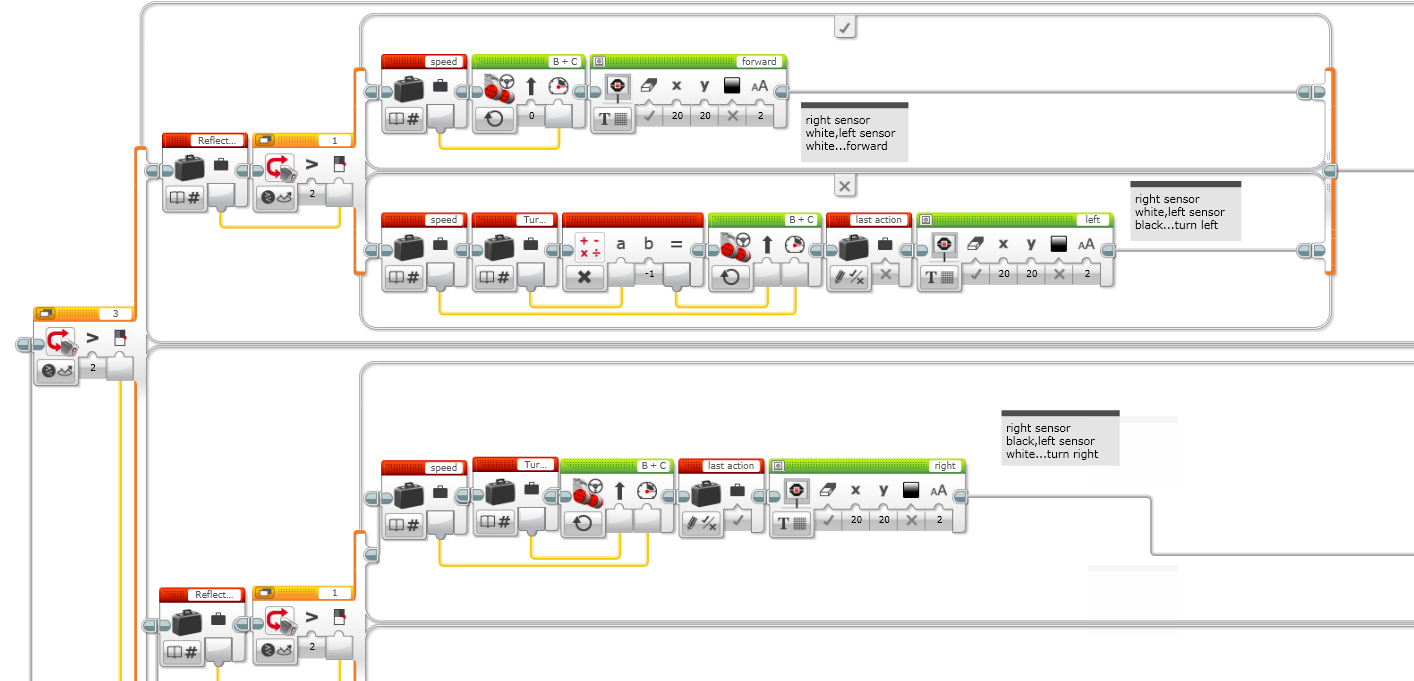
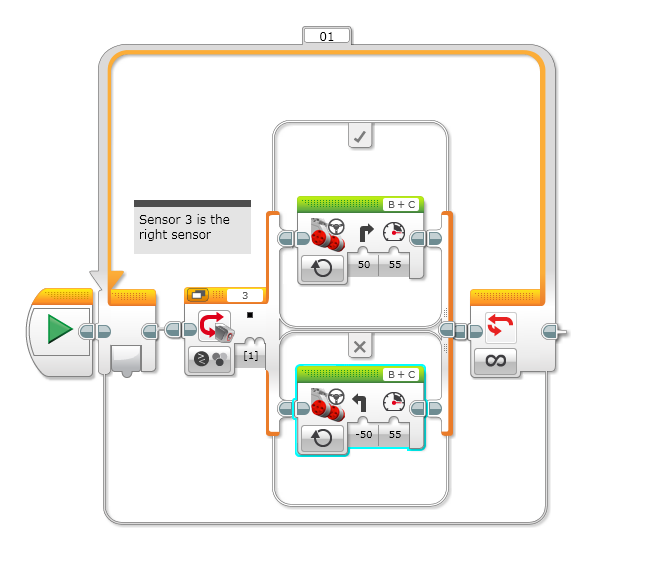
That first orange block on the left side is detecting if the right sensor is greater than 40 then it should take the top path but if it isn’t then it should go down. If it goes up it gets asked another question, is the left sensor greater than 40? If yes then take the top path if no then go down. If for both those questions its a yes then it means the robots on white so it should go forward.

If the answers were yes for the first question and no for the second then that means the right sensor is white but the left sensor is on black. if thats the case then it should turn left to get back on track.

Now back to that first question… if the answer was no then it would go down, meaning the right sensor is black. Once again it gets asked a second question, is the left sensor greater than 40? If yes take the top path if no then go down. By taking that top path it means it needs to turn right to get back on track.

If to both those questions the answer was no then the robot will go down the 4th path…

Silver Finder

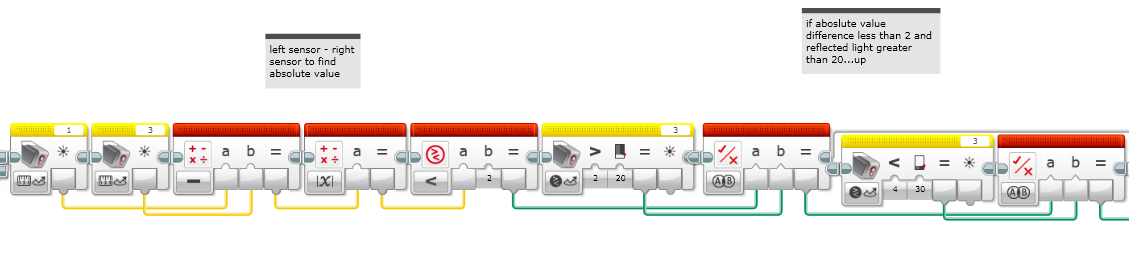
This is where it gets complicated to explain. The first 2 yellow blocks are detecting the reflected light, then that result gets put into the red block that takes those two answers and subtracts them. The answer to that gets put into the next red block which finds the absolute value of the number. That answer gets put into the next block and it asks if that number is less than 2. Then the yellow block checks if the right sensor is less than 20, if it is and if the absolute value of the other equation is less than 2 it should take the top path because it has found silver.

Silver

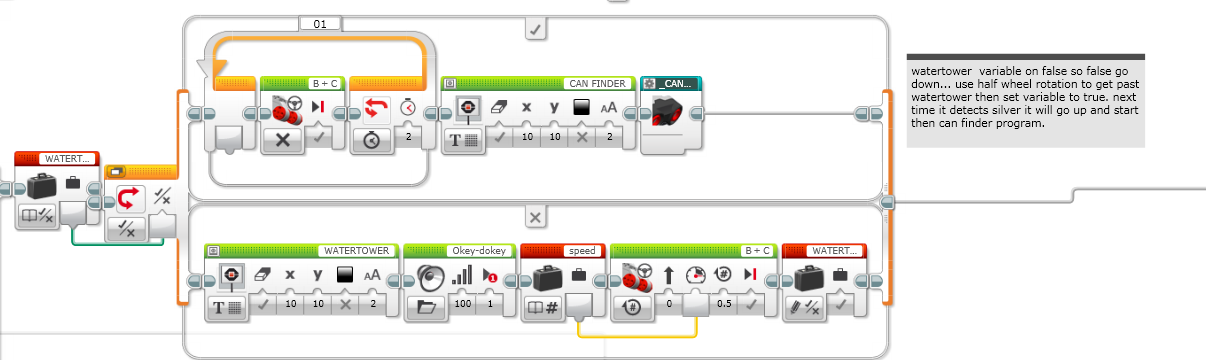
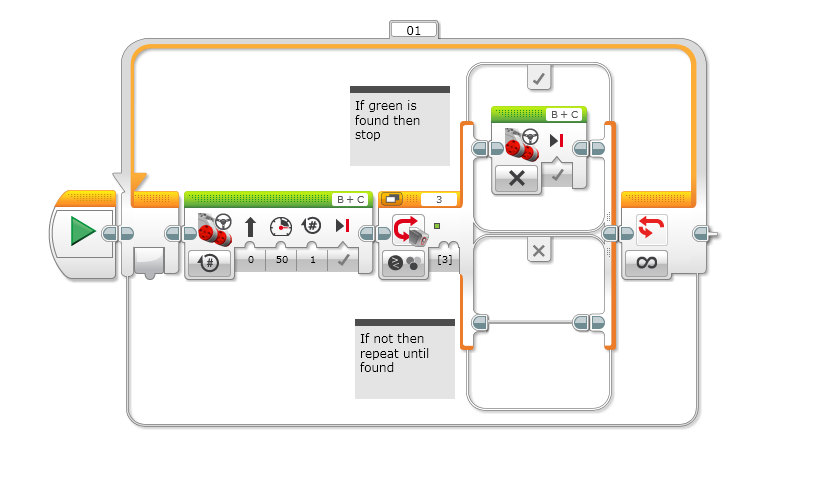
Since right in the beginning of the code the watertower variable was set to true then the robot will automatically take the top path. The top path makes the robot stop and stay still for a full 2 seconds, then after that it will start the can finding code.

Can Finder

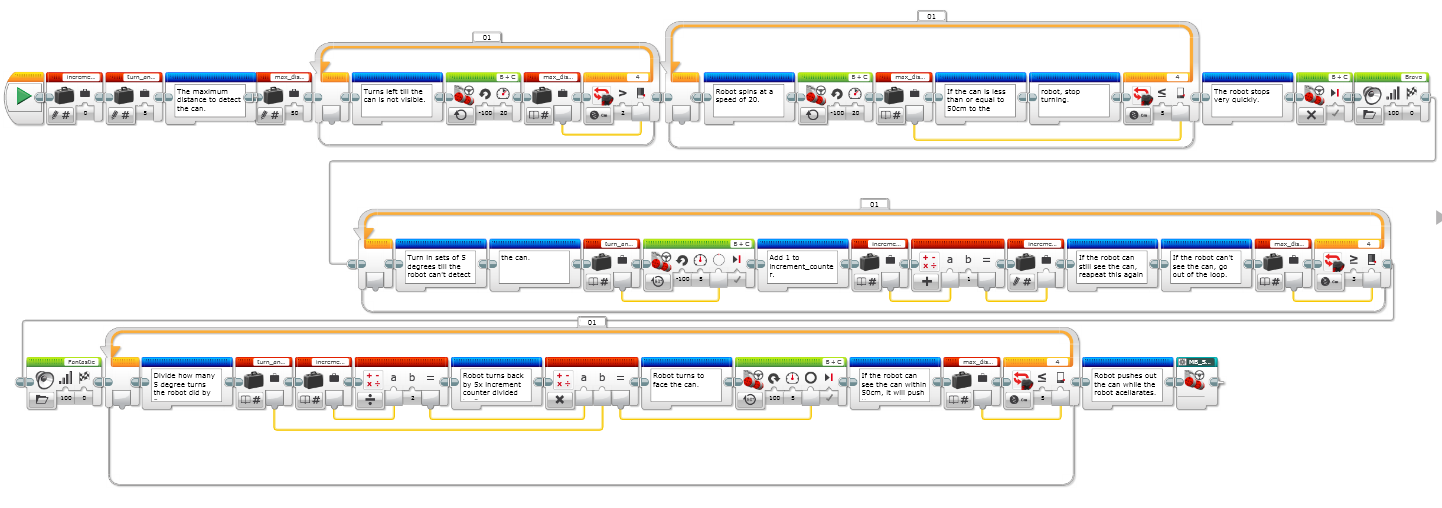
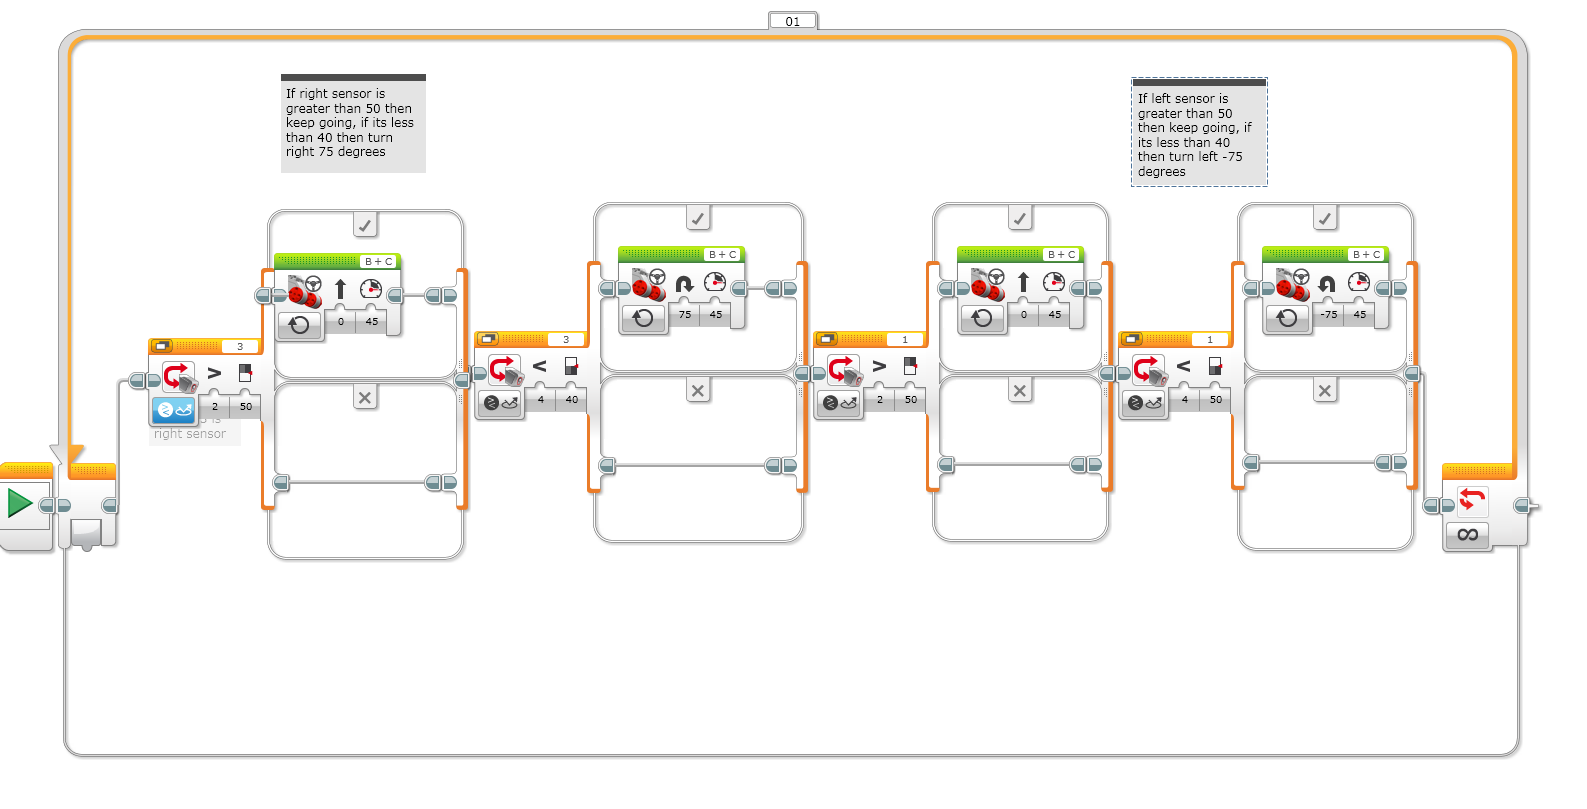
Thats our Can finding code. What happens when this is activated is that the robot stays still and goes round a full 360 degrees until it detects a can, after its found it the first time it will keep moving to a point where it stops seeing it. Then it will stop and go to the middle of the two points (the point where it first saw it and the point where it last saw it). Then it advances forward and pushes the can out of the green zone.

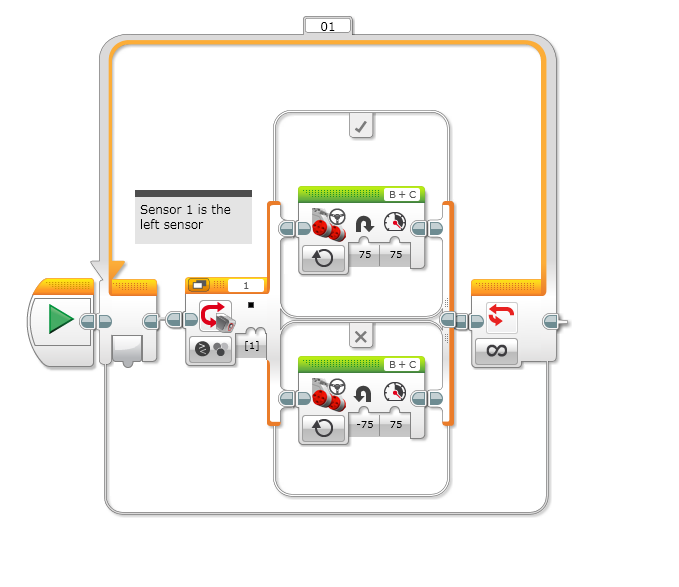
The final part of the code…

Hints

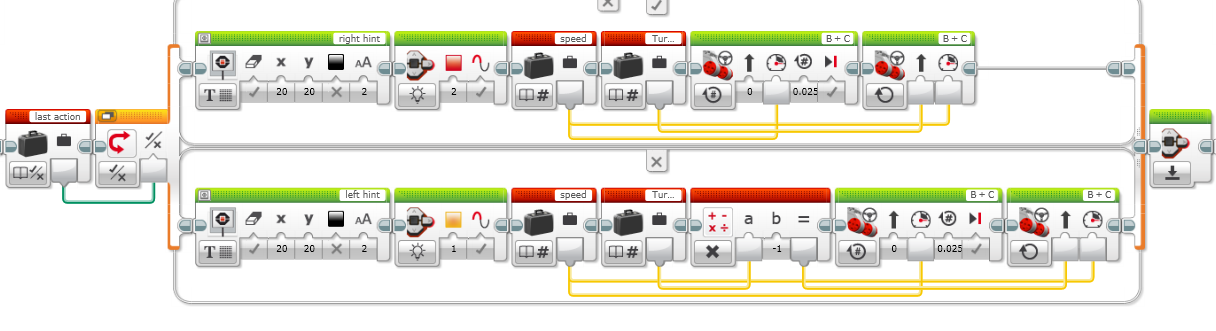
For the hints it looks for green, when it finds it it will go forward for 0.025 of a wheel rotation before turning left or right.

That’s it the complete walkthrough of our working completion code…

Week 10 – 2019 – Sara

Hello…

As I said last week none of our codes were working, so this week we were mainly trying to get everything going again.

I managed to get my line follower and hint finder working again, but I still have the problem on the robot not stopping after the ramp. What I started trying to do was to get the robot to know whether it is on green or silver. What I know so far : over 30 is white, between 20 to 30 black, 10 to 15 is green and 0 to 10 is silver. Now all I got to do is make sure the robot knows that too.

RoboCup jr is in about 2 weeks that means we all got to get our codes working soon. After getting the robot to stop on silver we still need to do the can finder code, so I think that’s what we’ll be working on next time.

I will keep you updated on how the codes going, but for now, bye…

Week 9 – 2019 – Sara

Hi…

So before I start I just want to say a big thank you to Mrs Bennett, who made the ramp for us, and even though it brought on a lot of new challenges, it was fun to solve. If we hadn’t gotten a ramp I’m pretty sure we would have showed up at the competition unprepared to work with the ramp. So, thanks Mrs Bennett…

This week was our first week back at robotics this term, and we worked on getting the robot up the ramp again. Over the holidays Rich changed the sensors on the robot by putting them a little closer to the wheels, so that when it went up the ramp the robot wouldn’t detect its shadow to much.

At first we just tested our codes to see if they would still work after the sensors had been changed, and guess what ,THEY STILL DID! We all had different thoughts on whether it would still work or not and most of us guessed it wouldn’t, but well its good to be wrong sometimes…

My code actually worked better with the sensors down, I didn’t even have to change anything. The thing that surprised me was that the robot was following the lines, going over the ramp, turning when it found hints. It was doing all these things really well with my code, but the surprising thing was that I didn’t even have a hint detector in my code. So I’m still not completely sure how it was working.

The last challenge I had was that the robot would get through the whole course, it went up the ramp but when it came down it wouldn’t stop on silver. So I changed my code and finally the robot went up the ramp, then down and when it got to silver it actually stopped! But, (there’s always a but) in doing so the robot no longer worked when it came to detecting the hints. So this time I’ll have to work out how to fix that.

Goodbye, for now…

Week 8 – 2019 – Sara

Hey again…

Unlike lasts weeks blog this is going to be short. At robotics this week we were working on how to get the robot to go up and down the ramp. You may think, oh that’s easy, but it’s not. Why? Because when the robot starts going up the shadow of the robot gets in the way making it reflect back less light, and when the robot starts coming down the sensors get too big and cover up the black line.

Our first idea was too dismantle the robot and put the sensors a bit higher, but that didn’t work because that just made the sensors even bigger. So we had to dismantle it again and rebuild it the normal way.

Our next idea was that, when the robot started going up the ramp it would reflect less light due to shadows, that meant that in our code where we told the robot to stop when both sensors detected less then 40 the robot would stop at the bottom of the ramp. To fix this problem all we had to do was change that piece of code telling the robot it should keep going when it detected less than 40 on both sensors.

But that brought on a new problem, after the robot had gone over the ramp it would still follow lines but when it got to the silver part it just kept going and wouldn’t stop. That’s what we’ll have to figure out next time, how to make the robot stop after it has gone over the ramp.

Hope next time we figure this problem out, bye…

Week 7 – 2019 – Sara

Hi there….

If your wondering why I didn’t write my blog last week well it’s because there was no robotics (James was sick). But I’m back at it again this week, and here’s what I did.

I worked on my 2 Sensor Line Follower again, the one from week 6 worked only on straight lines and some curves but this week I managed to get it going on staright lines and all curves. First Rich showed me a truth table, here’s an example of one…

This pretty much explains what should happen on all four of these situations. The first three are self explanatory but the last one is a bit different, the last one says not black on both sensors which means it’s either on green or silver. Green and silver also reflect less than 40 which is like black.

Line Follower 2.0
You can click on the picture to make it bigger

That was today’s finished code, I put in some notes to make it easier to understand. Here’s the big (and long) explanation…

I created 3 variable blocks, Speed, Turn Angle and Reflected Light. This is so that when I have to change one of these things I only change it on the variable block and it automatically changes the rest. After all these variable blocks theres a switch block, using the left sensor it will look for how much reflected light there is if its greater than 40 then it should continue by going upwards, if its less than 40 then it should go down ( I’ll explain the up part first). After this theres another switch block telling it the same thing (if its greater than 40 go up, if not go down.) The only difference is that this time its using the right sensor to do this. (Going up once again) This part says that since both sensor are greater than 40 indicating its on white, it should go forward with a speed of 37.5 ( I’ll explain why that is soon). Now if the left sensor is greater than 40 and the right sensor is not then the robot should turn right 187.5 degrees with a speed of 37.5. By turning it will make the robot get back with both sensors on white again and when that happens it will move forward.

We’re finally at the bottom part of the code! The bottom part is when the left sensor is less than 40, it then has another switch block. Using the right sensor it asks if its less than 40, if yes go up if not go down. (Going up this time, it’s the last time.) Now it gets a bit complicated, it takes the Turning Angle times it by -1 and then puts the answer as the new Turning Angle. Which now means that when the left sensor is less than 40 (meaning its black) and the right sensor is greater than 40 (meaning white) the robot will turn left -187.5 degrees. The last and final line of my code is when neither one of the sensors are greater than 40, (which means they are both a dark colour) when they are under 40 the robot must stop.

For me to get the right Speed and Turning Angle I changed the speed right down to 15 and experimented with which Turning Angle worked best on the sharp curves. In the end I had Speed at 15 and Turning Angle at 75, but I found that the robot was really slow so I multiplied both these numbers by 2.5 and got the answer that I used on my code, a Speed of 37.5 and a Turning Angle of 187.5.

Finally done with it all, ok bye…

Week 6 – 2019 – Sara

Hello…

This time at robotics me and Tamsin got challenged to make a 2 Sensor Line Follower. First we watched a YouTube video, which took quite awhile to find, but when we finally did find it we watched it. It explained a lot about 2 Sensor Line-Followers and truth tables. A truth table is basically writing that tells you what will happen when the robot does or detects something.

Here’s an example…

If right sensor and left sensor are on white then move forward. If right sensor is on black then turn right,if left sensor is on black then turn left. When both sensors are on white again move forward.

Tamsin and I wrote different codes but with the same goal (to make a 2 Sensor Line-Follower). On my first try the code actually worked, it followed straight lines the curves and the sharp curves. The only problem was that it was wiggling a lot. When I tried to fix that problem I just made it worse, after that the robot wouldn’t even follow straight lines (there were times when it would just go round round in circles). Near the end of the session I finally got the robot to follow straight lines again (the main problem was that I was only using the right sensor and I completely forgot to use the left one). The robot actually worked pretty well after that, it followed straight lines and even some curves not the sharp ones though.

This was the code I ended with…

Two sensor line follower

Here’s some explanation for the code. Using the right sensor the robot will look for reflected light (that is how much light reflects back, self explanatory right.) If the amount is greater than fifty, suggesting it’s white, it will move forward with a speed of 45. The next block tells the robot that is it’s less than 40, suggesting its black (but it could be any dark colour really), then it should turn right 75 degrees. Then the next to blocks are pretty much the same thing but for the left sensor, the only thing that changes is than if the left sensor sees black then it should turn left not right.

Usually a 2 Sensor Line-Following code works better and smother than 1 Sensor, but last week Rich showed us a 1 Sensor code that worked well and smoothly. We even thought it was using 2 Sensors.

Here’s my one Sensor code compared to my 2sensor unfinished code which is up there… ( just a few scrolls up actually)

1 Sensor Line-Follower

I think next time I will have to change the aggressiveness of the turn to make the other code work. But for now this is ok.

Bye…

Week 5 – 2019 – Sara

Hi…

This week we finally got the l sensor line follower to work. After getting used to how it was supposed to work it actually seemed quite easy.

This was the code I used last week…

1 sensor line follower

In my last blog I explained how my code worked,but if you haven’t seen it yet here’s a quick explanation. Using the right sensor the robot was supposed to find the right side of the black line,when that was found it was supposed to turn right, then when it detected white it would turn left,making the robot wiggle but follow the line at the same time. The main problem with this code was that the robot was using the right sensor and also trying to follow the right side of the line, and that made it really hard for the robot .

This was how I fixed the code to make it work…

1 sensor line follower
week 4

This is how this code works. The robot still looks for black, but with a difference this time it uses the left sensor. If it does find black then it should turn right 75 degrees with a speed of 75. When it finds white then it should turn left -75 degrees with a speed of 75. The reason I changed it from 50 to 75 was because last time it wasn’t doing any sharp curves, but by changing the angle to 75 it makes the robot do more aggressive turns. The change of speed from 55 to 75 is really only to speed up the process.

I think that the thing that made the biggest change to the two codes is the change from the left sensor to the right sensor.When it was using the right sensor the robot would keep going off the line and onto the white, that’s when it would get lost and go round and round in circles. But when it uses the left sensor the robot doesn’t go past half of the black line and that’s what keeps it going straight.

So, I guess that’s about it.

Bye…

Week 4 – 2019 – Sara

Hi again…

This time at robotics I made a simple 1 sensor line follower. I found it pretty complicated to get the robot to follow a straight line, that was partly because it wouldn’t start exactly on the black line sometimes it would start on white and thats when it wouldn’t work at all.

The code worked better when the robot was making turns but not so much for when it was going straight.

This was the code I finished, even though it didn’t completely work…

Pretty much all the code tells the robot is, if you see black turn right if you see white turn left. This makes the robot wiggle and follow the line at the same time. The reason why it wiggles is because I only used one sensor, if I had used 2 then it would have wiggled way less.

Well good bye, I’ll write again next week…

Week 3 – 2019 – Sara

Hello there!

This week in coding we did quite a lot. Here’s a few things we did…

First we started off by changing our code from last week (the one that made the robot make a square). Instead of making one wheel stop and wait for the other to spin 409 degrees, we made both the wheels keep moving, each in a different direction, thus making the robot move back and turn 90 degrees at the same time.

After this we started using the colour sensor. We had to use pseudocode once again to write our code later on, here was my pseudocode for the robot to detect the colour green…

Step 1: Move forward

Step 2: If green found completely stop

Step 3: If nothing found repeat until green is detected

That was my code for the robot to detect the colour green. It worked quite well, when I put the green Lego piece in front of it, it detected it and stopped, it stayed there until I removed the Lego block then it moved forward again searching for some more green.

This was my next challenge…

Step 1: Move forward

Step 2: If green found completely stop, if not keep moving forward.

Step 3: If red found stop and wiggle 5 times, if not keep moving forward.

Step 4: If no colour is detected keep moving until something is found…

That was my finished code. The first block told the robot to move forward at a speed of 50, the second block told it to look for the colour green, then it had a switch block after that which meant that if green was found the robot should stop but if it wasn’t found then it should keep moving. After that it had another switch block, but this time it was looking for the colour red, if red was found then it should stop and wiggle on the spot 5 times, if not then it would keep moving until one of the 2 colours were found. All of this was put inside a loop block, which meant it was going to keep doing this until someone stopped the robot.

Ok I guess that’s it, I’ll write again soon with more to tell from our next time at robotics…

Week 2 – 2019 – Sara

Hello there !

This week at robotics we finally started doing our own codes. It was really fun, it was kinda hard at the start but then I got the hang of it.

We started of by writing pseudocode for the robot to make a square. This was my pseudocode…

Step 1 : Go forward 10 inches ( around 25 cm) Step 2 : Turn left 90 degrees Step 3 : Repeat steps 1 and 2 three more times

This was my finished code…

The first green block was to tell the robot to move forward for two wheel rotations at a speed of 50, the second block was telling it turn off its left motor but the right motor should keep going and turn 409 degrees to the left. Then repeat this three more times.

The hardest part was finding the right number of degrees it should turn, I started of at 300 degrees and kept increasing until I found a degree that it had turned perfectly.

At first I thought that if I put 90 degrees it would make a perfect turn, but no, because I was coding for the right motor it meant it had a longer way to turn than the left motor. And if I put down that the left motor should turn 90 degrees I think it wouldn’t have worked because it would have needed the right motor to come along with it and that would mean I would have to wright two different degrees for each of the motors.

Ok , goodbye I’ll wright again next week.